Sunday, February 20, 2011

Windows In


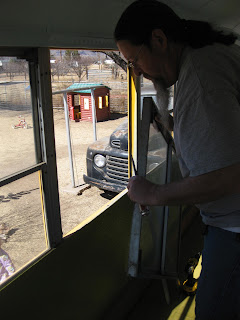
With the glass windows out, we are replacing them with 24 guage sheet metal, a layer of 1/2" foam board and then 3/4" plywood cut to size.  Another bonus to having some of the windows out is some much needed insulation!  Maybe it will keep some cool air in in the summer and cold air out in the winter.

Jim Bob went to our local AC place and bought sheets of metal from those guys.  He then took it up to the metal shop at school where he cut it to fit the windows using a foot shear and put this nifty 1" lip at the bottom to hold the metal in place, to give the metal rigidity and to give some surface area for the caulking.  He made the bend by using a metal brake.

A sheet of 3/4" plywood was then cut and placed on the inside of the window to finish it out.


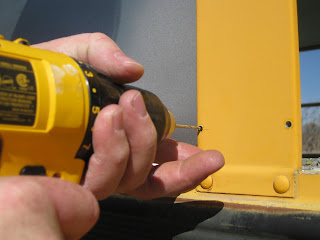
Jim Bob screwed it all together from the outside being careful not to screw all the way through the plywood on the inside, leaving a nice clean surface to work with later on when we want a backsplash.


Jim Bob has a nice little helper these days. 

We are replacing six windows on each side of the bus.  I think eventually we will put a little window in over the kitchen sink for a nice view.  This picture shows four windows complete and two windows lacking the foam insulation and the 3/4" plywood.


It is nice and clean on the outside too.

Here is a video showing the installation of one of the windows.  In Jim Bob style, it all fits together nicely.

Nice Breeze

Jim Bob removed six windows today.  We are having to take the windows out for a couple of reasons:   1. The cabinets are higher than the windows which means that they will look pretty funky from the outside.  I find that it rather funny that we are concerned what it will look like from the outside when we are living in a bus.  I guess we have to draw a line somewhere?  2. We might need to bolt the cabinets to the plywood that is taking the place of the glass window.  3. Some privacy would be nice.  4. We are going to put a nice little tile or metal or some fun little backsplash to give a little personality to the space. (I am excited about this project!) 


JB is chiseling off the old crud that held the windows in and kept the rain out.


One window out - five more to go on this side.  Six more to go on the other side.

We are back!

Six months has passed since the bus has been touched.  Too long.  Time passes so fast and life happens too fast, sometimes we can't keep up!  But now that the weather is beautiful (at least for the next few days) and our schedules are giving us a break - it is time to give the bus some much needed TLC. 

I actually put together the cabinets for the bus over the Christmas break.  All those wonderful Ikea boxes were scattered throughout the kitchen.  I wasn't expecting it to take me 3 evenings to put it all together but it did!  Those Ikea engineers are quite brilliant.  The cabinets went together very smoothly and seem pretty durable.  I can't wait to try them out!


Here are the cabinets in the bus.  They take up a lot of room, don't they?  This isn't where they will go permanently.  This is just where they were sat down...eventually they will go on this side of the wheel wells (our bed will be where the cabinets are.)

Monday, August 9, 2010

The Land

In case you haven't noticed, there is a new page across the bar up there:  The Land.  Check it out.  I posted some pictures of our property.  Noticed how I said "our property?"  Yep, that's right.  We closed on the property and it is officially ours.  I wanted to post videos on the "The Land" page but Blogger wouldn't let me for some reason. So I will post it here.  Hope you enjoy.


Still working...

We are still here!  We are still working on the polyurethane floors.  It is a super slow process.  We've busy been sanding, wiping, coating and then drying for some days.  In between that, we have been busy with a garage sale (first of many), construction on our house and a vacation.  Jim Bob is starting back in the studio to produce work for the big show in October, The Texas Clay Festival.  That means that the bus will take the back burner until November.  I'm sure there will be intermittent work between now and then but probably nothing drastic.  We did buy our kitchen cabinets at Ikea while we were in Round Rock.   The cabinets are in boxes in our kitchen.  I should take a picture of that.  It will probably take us until November to put all those freakin' cabinets together!  Got to love Ikea! Jim Bob wanted me to give a "shout out" to Rachael at Ikea.  She really knows her Ikea kitchen software.  She got us hooked up and squared away, super patient and easy to work with.  Highly recommended! Thanks Rachael!


Jim Bob is still applying poly to the floors.  Today, he got up early and applied the third coat.  It's looking great.


This time around, Jim Bob thought he would try out a new applicator.  He said it worked much better than the sponge business.  It seemed like it went a lot faster.


You can see that line between the 3rd and 2nd coat of polyurethane.  The grain is really looking nice.  I think we have 2 more to go.   

Sunday, August 1, 2010

First Coat of Polyurethane

The first coat of polyurethane is down.  The floor is soaking it right up.  We tried applying the poly with a sponge roller but that put too many air bubbles into the polyurethane.  Bubbles and poly are a very bad combination.  So, Jim Bob is rolling the poly onto the floor with the sponge roller and then wiping the air bubbles away with a sponge brush.  I know that they have those wooly polyurethane applicators but Jim Bob didn't like the texture they left behind.  This is what he came up with and it is working out great so far, just a bit slower.

Before the poly could be applied, we sanded down the raw washed surface.  This will be done a lot!  If you will notice, that sander Jim Bob is using is t-i-n-y!


Sanded floor.


After sanding, Jim Bob had to go back and wipe all the saw dust off the floor with a damp cloth. 


The top/right side shows the first coat of polyurethane on the floor.  The bottom/left side shows the raw floor.  You can really tell how the poly makes the wood grain pop!  Of course, this is wet and it won't look this shiny after it is dry but maybe it will look close after 4 or 5 coats.


One coat of polyurethane complete.  Four more to go.

The floors are washed in green!

We made it back in town after being away on a week long vacation.  Now it is back to work.  Before we left, we were able to get the floor "washed" and the first coat of polyurethane down.  It looks great.  Each coat of poly that goes down will make the floor look even better.
The floor was sanded down and wiped clean.


We watered down latex paint in a bucket and used a rag to "wash" the floor.  Then we used a clean rag to wipe away the extra watered-down-paint.


The paint was pretty runny and didn't take much to stain the floor.


Jim Bob had to be pretty careful not to overlap or drip the paint.  We didn't want it to turn out spotty or darker in some areas.


Finished wash floor with no polyurethane.  You can see the wipe marks at this stage but that will go away after the sanding and polyurethane.


Closer look at the floor.  After the paint dries, we will sand it down to get rid of any raised surface area.  That will allow some more grain to show through the paint.  We will be sanding between each coat of poly too.


Our dang cat!  She jumped right in the bus and walked all over the place! I threatened her life but she didn't care.  I guess she was just checking it out.  It would be fun to have little cat paw prints on the floor!